Now I love combining beautiful fabric into quilt tops. Unfortunately, I don't necessarily enjoy the rest of the quilt making process; but that's part of making a quilt. One of my other faults is that I get bored with anything that becomes tedious and takes lots of time. I tried 'hooking' a wall hanging once. Just one of many boring projects which remained incomplete. So I mostly make baby quilts. They're fast enough and not too large to handle on my sewing machine.
Have you heard the story of the ugly duckling. No? Well basically a poor little ugly "duckling" was really a swan and turned out to be very beautiful. Did you know that an ugly piece of fabric can be just like that ugly duckling? Yes, even that ugly fabric can be turned into a beautiful swan of a quilt. Here's an example.
Ugly right? And a baby quilt? The other piece of fabric was nearly as bad, but I forgot to take a picture. Why use these if I thought they were so ugly? I wanted something bright and colorful. I was making a quilt for a baby boy and most of the fabric in my stash (some is still from donations like this one) would work better for a little girl. But everyone seems to be having boys these days.
So here is a pictorial of the quilt I made. I used a bargello technique to an extent.
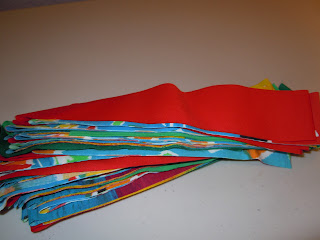
First I cut the fabrics into strips - all the same width. Then I sewed them together in random order. I worked in sections and then put those together. I used a 1/4 inch seam allowance and ironed the seams flat. Believe me when I say that the iron is your best friend when quilting.
Mark your edge line with several layers of masking tape.
Place you two pieces along the masking tape guide and you'll get a good 1/4 inch seam.
 |
| All the strips sewn together in random order. |
The ends may not be even, but that's okay, you'll trim that off.
I sewed the last strip to the first strip so it made a big loop of material.
Next you'll cut the strips crosswise. They should be different widths increasing by 1/4 to 1/2 inch increments.
Next you want to move the strips up or down one position so they step up or down.
When ironing the seam allowances, you want them in opposing directions so they snug up to one another. This kind of locks them together and makes sure you get a good match at the seam.
Once all the strips are sewn together, remove one seam crosswise and open up. You can see the effect you get by cutting the crosswise strips different widths.
Next I sandwiched the top to the bottom with a layer of batting in the middle. The backing will lie face down with the top face up. Now it was time to baste the layers all together to hold everything in place until it's quilted. My fingers aren't used to using a needle so extensively and I couldn't get the hang of using a thimble, so I used multiple layers of masking tape. Worked really well!
 | ||||||
| The other great use of masking tape is as thimbles. |
 |
| This shows front and back after quilting. I always leave the excess batting and backing until after quilting is completed and then trim the edges to be even and squared. |
 |
| Front close up. |
 |
| Close up of the back. I chose to quilt around the little dinosaurs. |
Finally I added a binding and this is the finished article. Beautiful right? At least I think so.
There are lots of good videos on YouTube and great books available about quilting if you're interested in learning more. I would recommend one book that has helped me with the basics and plenty of helpful tips. The book is Better Homes and Gardens Complete Guide to Quilting.


This is amazing!
ReplyDelete